Microblading Aftercare: Your Complete Step-by-Step Healing Guide
Recent Post
This is exactly why microblading aftercare is so important. If you skip steps, expose the area to bacteria, or disrupt the healing skin, the pigment can fall out unevenly, fade too quickly, or, in rare cases , the area can become infected. Follow the steps correctly, and your results can last anywhere from 12 to 18 months before needing a touch-up.
At Symetrie Studio Spa, our artists in Lafayette provide every client with a personalized eyebrow aftercare kit and instructions. But this guide gives you a detailed breakdown of everything you need to know, before, during, and after the healing process.
Microblading Healing Timeline , Day by Day What to Expect
One of the most common concerns after a microblading session is not knowing what is "normal." The healing process has distinct phases, and knowing what to expect at each stage will save you from a lot of unnecessary worry.
Day 1 , Right After Your Appointment: Dark, Bold, and Beautiful
Your brows will look noticeably darker and more defined right after the procedure. This is completely normal. The color you see on Day 1 is typically 30-40% darker than your final healed result, so don't panic.
You may also notice some redness and very slight swelling around the brow area. Your skin has been worked on, so this is just your body's natural response. Within the first 2-3 hours, a small amount of lymph fluid (a clear or slightly yellow liquid) may appear on the surface. Gently blot this away with a clean tissue every 30 minutes , do not wipe or rub.
Days 2-4 , Scabbing Begins, Itching Starts
By day two or three, your brows will start to feel tight and itchy. Thin scabs will begin to form as your skin heals underneath. The color may appear even darker during this phase because of the scabbing.
This is the stage where most people make their biggest mistake , scratching or picking at the scabs. Resist this urge completely. The scabs are protecting the pigment underneath. Remove them early, and you pull out the color with them, leaving patchy, uneven brows.
Continue gently cleansing twice a day and applying a thin layer of your aftercare ointment (more on this in the next section).
Days 5-7 , Peeling and Flaking
Around days 5 through 7, the scabs will start to flake and peel off on their own. This is a good sign, it means your skin is healing properly. The brows may look patchy or uneven as the scabs shed, but this is temporary.
Let the scabs fall off naturally. Some flakes will come off while you are washing your face or just going about your day. This is fine. Just never pull them off, even if they look loose.
Days 8-14 , The "Ghost Phase" (Don't Freak Out)
This phase confuses almost everyone who goes through it for the first time. Around days 8 to 14, your brows may look like they have almost completely disappeared. The color seems to vanish, and you might think the microblading did not take. This is called the "ghost phase," and it is completely normal.
What is actually happening is that a fresh layer of skin has grown over the pigment, making it appear lighter. The pigment is still there, it just needs a few more weeks to push through and become visible again. Stay patient. Do not go back for a touch-up yet.
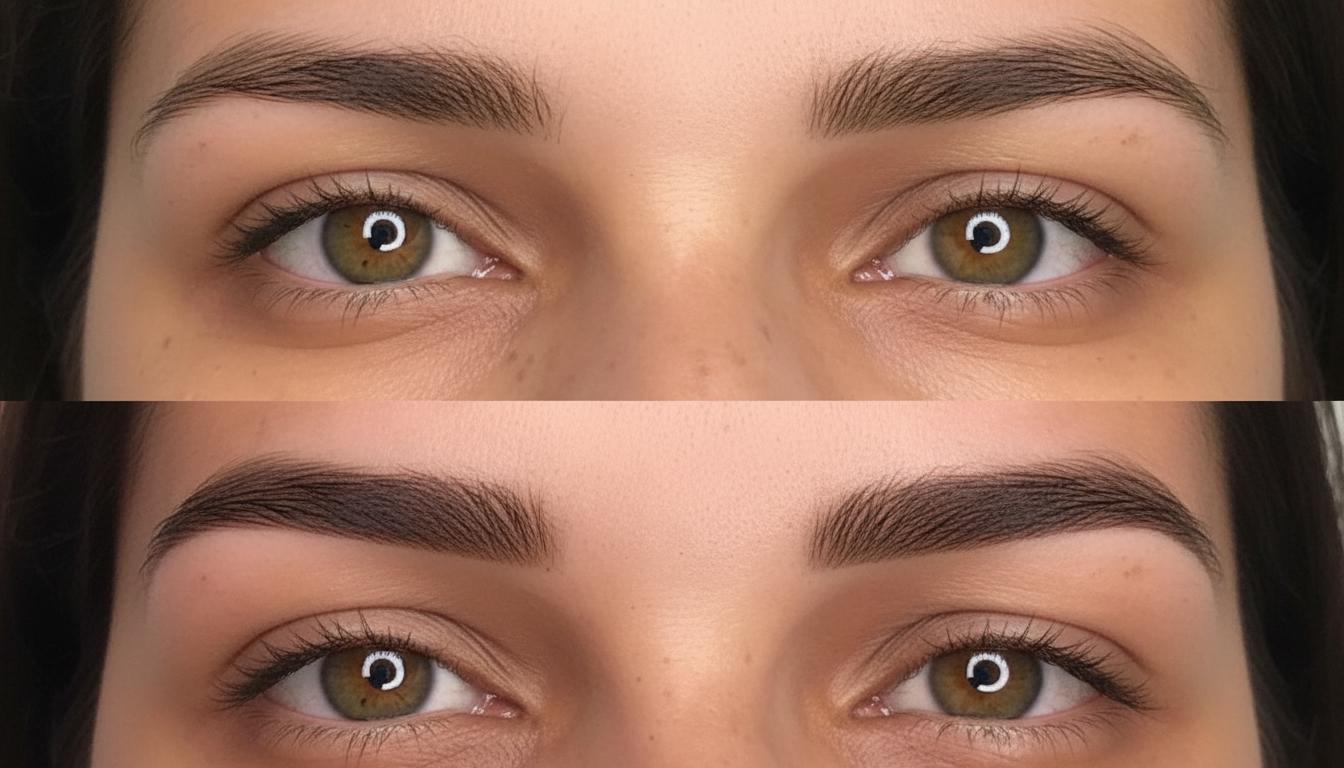
Weeks 3-6 , Color Returns, Final Shape Emerges
Good news: your brows are back. Starting around week 3 or 4, the pigment begins to surface through the new skin layer, and the color gradually returns. You will start to see your true healed color during this period.
By week 6, most clients have a clear picture of their final result. The color will be softer and more natural-looking than it was on Day 1, which is exactly what well-done microblading should look like.
6-8 Weeks , Your Touch-Up Appointment
At Symetrie Studio Spa in Lafayette, we recommend scheduling your microblading touch-up appointment at the 6-8 week mark. By this point, your brows are fully healed, and your artist can assess how the pigment settled and make any refinements needed , filling in any gaps or adjusting the shape. This touch-up is a normal part of the microblading process and is typically included in your initial service.
Microblading Aftercare Instructions , The First 10 Days
These are the steps you need to follow immediately after your appointment and throughout the first two weeks. Think of this as your brow healing routine.
Step 1: Blot Away Lymph Fluid (First 2-3 Hours)
Right after your session, a small amount of lymph fluid will seep from the treated area. Use a clean cotton pad or tissue to gently blot (not wipe) the area every 30-45 minutes for the first 2-3 hours. This prevents the fluid from hardening into thick scabs.
Step 2: Clean Your Brows Twice Daily
Starting the evening of your appointment, gently cleanse your brows with a mild, fragrance-free antibacterial soap , something like Dial or Cetaphil works well. Use clean fingertips, not a washcloth or sponge. Wash in small, circular motions for about 10 seconds, then rinse with lukewarm water and pat dry with a clean tissue.
Do this every morning and evening for the first 10-14 days.
Step 3: Apply a Thin Layer of Aftercare Ointment
After cleansing and drying, apply a very small amount of Aquaphor or the ointment recommended by your artist. We are talking about the size of a grain of rice for each brow , spread it into a thin, barely-there film.
This is important: more is not better here. A thick layer of ointment will suffocate the skin and slow down healing. A thin layer keeps the area moist enough to heal without blocking airflow.
Step 4: Keep Water Away From Your Brows
For the first 7-10 days, do your best to keep water from hitting your brows directly. When you shower, tilt your head back or use your hand as a shield. Skip long, hot steamy showers, as the steam alone can loosen scabs prematurely.
No swimming, hot tubs, or saunas for at least 2 weeks. These environments are full of bacteria and moisture that can seriously disrupt the healing process.
Step 5: Sleep on Your Back (If Possible)
For the first 10 days, try to sleep on your back to avoid rubbing your brows against the pillow. If you are a side sleeper, switch to a clean satin or silk pillowcase , the smooth surface causes less friction than cotton and is gentler on healing skin.
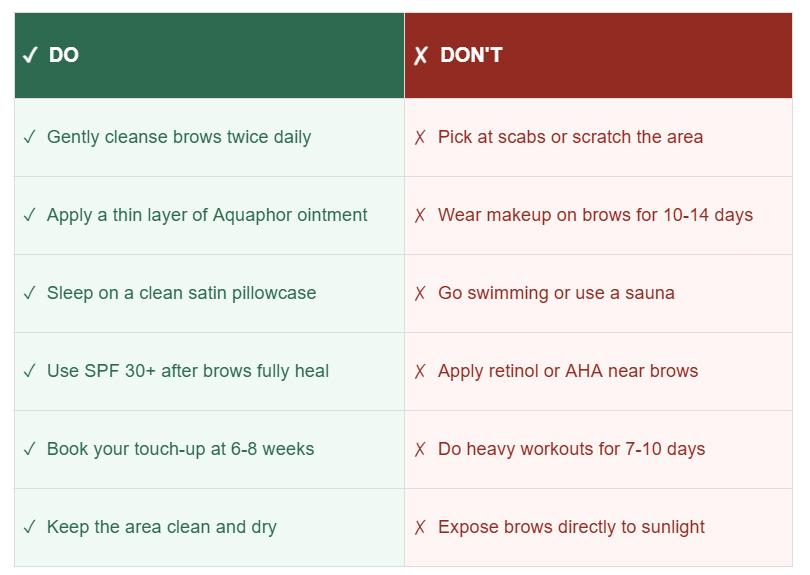
Microblading Aftercare Do's and Don'ts
Here is a simple reference you can come back to at any point during the healing process:
Book Into our Symetrie Studio Spa
Ready to take the next step? Book a consultation with a qualified permanent makeup artist.
Book Now
The surface skin typically heals within 10-14 days. However, the deeper layers of skin continue healing for up to 6 weeks. That is when you will see your true, final color. Most clients look fully healed to others within about 2 weeks, but the full process takes closer to 4-6 weeks.
Yes, you can and should wash your face , but with caution around your brows. Cleanse the rest of your face normally, but keep water and soap away from the brow area for 7-10 days. After that, you can wash your face as usual.
Getting your brows wet too soon can soften and loosen scabs, pulling pigment out of the skin prematurely. This leads to patchy, uneven healing and poor color retention. It will not ruin everything in a single incident, but repeated or prolonged exposure to water during the first two weeks will noticeably affect your results.
This is the ghost phase , and it is completely normal. A fresh layer of skin has grown over the pigment, making it look lighter or nearly invisible. The pigment is still there. Over the next few weeks, it will gradually resurface and you will see your true healed color return.
Wait at least 10-14 days before applying any makeup directly on or around your brows. This includes eyebrow pencils, powders, gels, and brow tints. Applying makeup on open or healing skin can introduce bacteria and disrupt the healing process.
Light walking is fine, but avoid any workout that causes heavy sweating for the first 7-10 days. Sweat is salty and acidic, which can irritate healing skin and soften scabs. It can also introduce bacteria into the treated area. After day 10, you can gradually return to your normal exercise routine.
Most clients return for a color refresh every 12-18 months. The timeline varies based on skin type (oily skin fades faster), sun exposure, skincare products used, and individual metabolism. Your Symetrie Studio Spa artist can give you a more personalized estimate based on how your skin heals.
There are some similarities, but microblading is shallower than a traditional tattoo and uses different pigments. This means the eyebrow aftercare process tends to be shorter and less intense than tattoo aftercare. The key principles , keep it clean, keep it moisturized, don't pick , are the same.
Book Into our Symetrie Studio Spa
Ready to book your microblading session, or looking to explore our full range of permanent makeup services in Lafayette? Visit us at Symetrie Studio Spa , where beautiful brows begin.
Book Now