Microblading Healing Process: Complete Day-by-Day Guide (Days 1-42)

Microblading Healing Process: Complete Day-by-Day Guide (Days 1-42)


31 minute read · 02/20/2026 15:55:00

Getting microblading done is exciting, but understanding the healing process is just as important as the procedure itself. If you're in Lafayette and considering this life-changing beauty treatment, you're probably wondering what happens after you leave the studio.


At Symetrie Studio Spa, we've guided hundreds of clients through their microblading journey, and we know that knowing what to expect can make all the difference. The healing process typically takes 4-6 weeks, and yes, your brows will go through some interesting changes along the way!


In this comprehensive guide, we'll walk you through every single day of the microblading healing process, share expert aftercare tips, and answer all those questions you're too afraid to ask. Whether you're preparing for your first appointment or you're currently in the healing phase wondering if what you're seeing is normal, this guide has you covered.


What is Microblading and How Does It Work?

Before we dive into the healing timeline, let's quickly cover the basics. Microblading is a form of semi-permanent makeup that creates natural-looking eyebrows using tiny, hair-like strokes. Unlike traditional tattooing, microblading uses a manual hand tool with ultra-fine needles to deposit pigment into the upper layers of your skin.


During your microblading appointment at our Lafayette studio, your technician carefully creates individual strokes that mimic your natural brow hairs. The entire process typically takes 2-3 hours, including consultation, numbing, and the actual procedure.

Recent Posts

Because microblading creates small cuts in your skin to deposit pigment, your body treats it like any other wound. This means you'll experience a natural healing process that includes scabbing, flaking, and temporary color changes. Understanding this process helps you avoid panic when your brows don't look perfect immediately!


How Long Does Microblading Take to Heal Completely?

Here's the timeline you need to know:


Surface healing: 7-14 days Complete healing: 4-6 weeks Final results visible: 6-8 weeks (after touch-up)

The surface of your skin heals relatively quickly, usually within two weeks. However, the deeper layers of skin where the pigment sits take longer to fully heal and settle. This is why your microblading results won't be final until after your touch-up appointment, which typically happens 6-8 weeks after your initial procedure.


During your consultation at Symetrie Studio Spa, we'll give you a personalized timeline based on your skin type, age, and lifestyle factors. Everyone heals slightly differently, so your experience might vary from your friend who also got microblading done.


Microblading Healing Stages: Understanding the Three Phases

Your microblading healing process happens in three distinct phases. Understanding these phases helps you know what's normal and what's not.


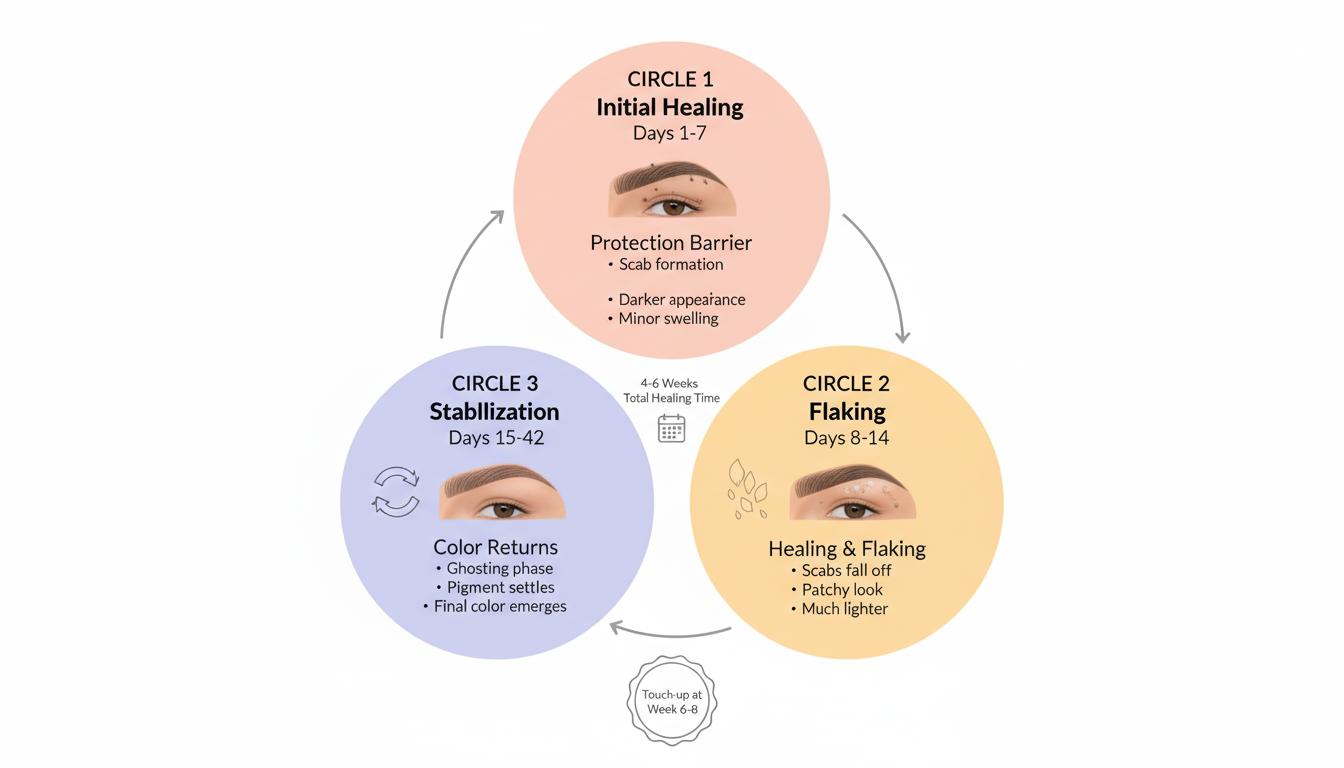
Phase 1 – Initial Healing (Days 1-7)

This is the acute healing phase where your body immediately responds to the procedure. Your skin works to close the tiny cuts made during microblading and forms a protective barrier. You'll notice your brows are darker, bolder, and may feel slightly tender.


During this phase, your body sends healing cells to the area, which causes slight swelling and redness. A thin layer of lymph fluid may appear on your brows, which eventually forms scabs. This is completely normal and part of your body's natural healing response.


Phase 2 – Flaking and Regeneration (Days 8-14)

The scabs that formed during Phase 1 start to flake off naturally. This is when many people get nervous because their brows can look patchy and uneven. But don't worry! This is exactly what should happen.


As the scabs fall off, they take some pigment with them. This is why your brows will appear much lighter than they did immediately after your procedure. Your skin is also regenerating new cells during this phase, which pushes the pigment deeper into the skin layers.


Phase 3 – Color Stabilization (Days 15-42)

This final phase is all about the pigment settling into its permanent position. Many clients experience what we call the "ghosting phase" during weeks 2-4, where their brows appear very light or almost invisible. This can be alarming, but it's temporary!


The pigment is actually still there, sitting beneath the fresh layer of skin that regenerated during Phase 2. As your skin continues to heal and the new cells mature, the color gradually comes back. By week 6-8, you'll see your true results emerge, though you'll still need that touch-up appointment to perfect everything.


Microblading Healing Process Day by Day: What to Expect

Now let's get into the detailed, day-by-day breakdown. We'll tell you exactly what's happening with your brows and what you should be doing each step of the way.


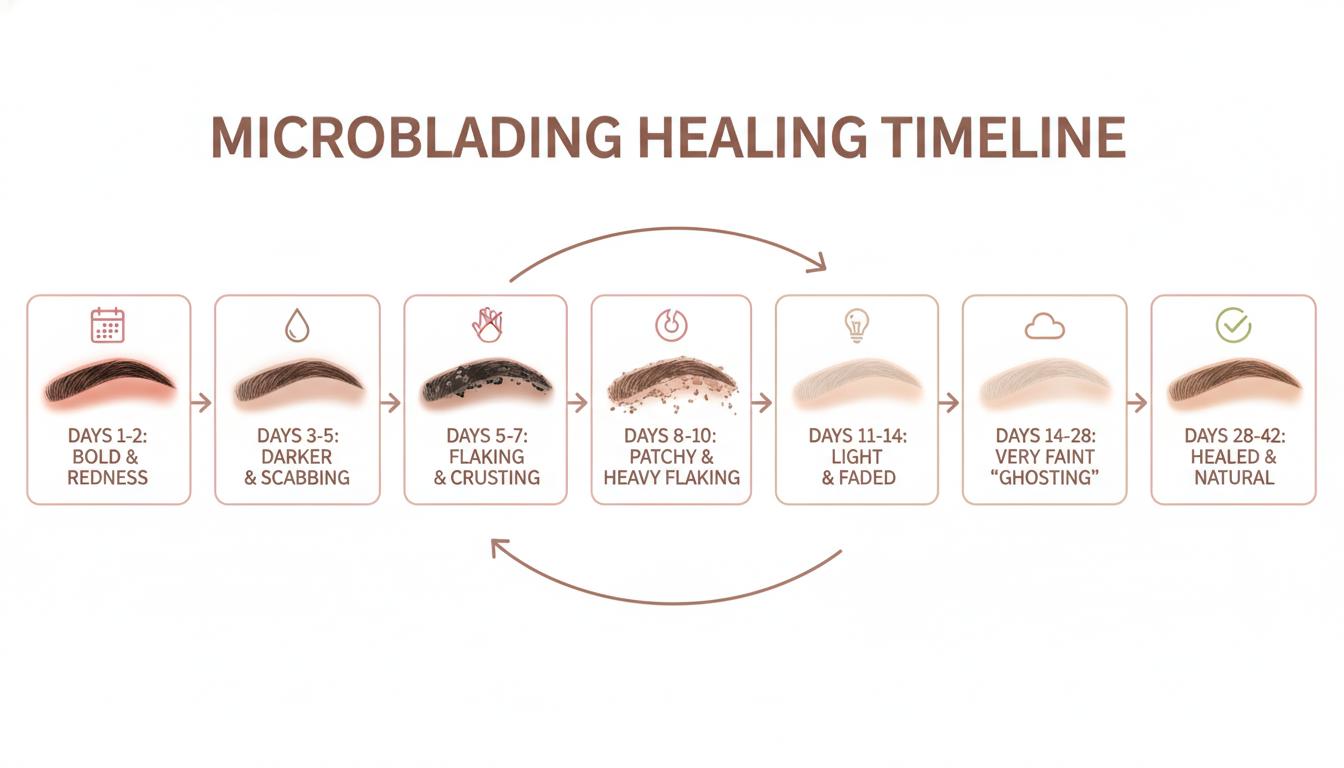
Day 1-2 (Immediately After the Procedure)

  1. What you'll see: Your brows look absolutely amazing! They're bold, dark, and perfectly shaped. Many clients take tons of selfies during these first two days because their brows look so good. However, they're actually about 30-40% darker than your final result will be.
  2. What you'll feel: Your eyebrow area might feel slightly tender, similar to a sunburn. Some people experience minor swelling or redness, but this is usually minimal. You might also notice a small amount of lymph fluid (clear liquid) on your brows.
  3. What to do: Keep your brows clean and dry as much as possible. Gently blot away any lymph fluid with a clean tissue. Avoid touching your brows except during cleaning. Sleep on your back with your head slightly elevated to reduce any swelling.
  4. What to avoid: Water, sweat, makeup, and direct sun exposure. Don't work out or do any activities that make you sweat. Stay away from steamy showers and don't let water hit your face directly.


Day 3-5 (Color Darkening Phase)

  1. What you'll see: Your brows may appear even darker than they did on days 1-2. This is because the pigment is oxidizing (reacting with oxygen) and the scabs are beginning to form. Don't panic! This darkness is temporary.
  2. What you'll feel: You might start experiencing some itching. This is a sign that your skin is healing, but it can be uncomfortable. The area might also feel slightly tight as scabs start to form.
  3. What to do: Continue your gentle cleaning routine 2-3 times daily. Use the approved cleanser provided by your microblading artist. Pat your brows dry with a clean tissue or let them air dry. Apply a very thin layer of healing ointment if recommended by your technician.
  4. What to avoid: Do not scratch or touch your brows, even if they itch! Avoid steam rooms, saunas, and hot yoga. Keep your hair away from your brows and continue avoiding makeup in the area.


Day 5-7 (Flaking Begins)

  1. What you'll see: Small scabs start forming and your brows might look a bit crusty. You'll notice tiny flakes beginning to come off. Your brows may look uneven as some areas flake before others. This is the phase where most people start to worry, but it's completely normal!
  2. What you'll feel: The itching usually gets worse during this phase. You might feel like your skin is tight and dry. Resist the urge to pick or scratch! Some people describe this feeling as similar to a healing sunburn.
  3. What to do: Keep up with your cleaning routine but be extra gentle now that flaking has started. Continue applying a thin layer of healing ointment if your technician recommended it. Some artists prefer the "dry healing" method, so follow your specific aftercare instructions.
  4. What to avoid: This is crucial – do not pick, peel, or scratch off the flakes! Let them fall off naturally. Picking can remove pigment and cause scarring or infection. Continue avoiding water, sweat, and makeup.


Day 8-10 (Heavy Flaking Phase)

  1. What you'll see: This is peak flaking time. Your brows might look patchy, uneven, and much lighter than before. Some areas might flake completely while others still have scabs. It's not pretty, but it's temporary! Your brows might look like they're disappearing in some spots.
  2. What you'll feel: The itching should start to decrease as more flakes come off. Your skin might feel dry and tight in some areas while other areas feel completely normal.
  3. What to do: Continue being patient and gentle. Keep cleaning your brows but avoid rubbing or scrubbing. If you're using healing ointment, you might be able to reduce the frequency now. Check with your technician about when to stop using it.
  4. What to avoid: Still no picking! This is the phase where it's most tempting to help those flakes along, but don't do it. Continue avoiding excessive water, swimming pools, and intense exercise. You can probably return to light exercise if your brows aren't getting sweaty.


Day 11-14 (Flaking Ends)

  1. What you'll see: Most or all of the flaking should be complete by now. Your brows will look much lighter than they did during the first week – often 40-50% lighter! They might look a bit thin or faded. Some clients even think their microblading didn't work. Stay calm – this is exactly what should happen.
  2. What you'll feel: The itching should be gone. Your brows should feel back to normal. You shouldn't feel any tenderness, tightness, or discomfort.
  3. What to do: You can stop using healing ointment now (unless your technician advises otherwise). Continue keeping your brows clean with a gentle cleanser. You can start resuming more normal activities.
  4. What to avoid: You can resume most normal activities now, but continue avoiding harsh skincare products on your brows. Stay away from retinols, glycolic acid, and exfoliants near the eyebrow area. These can fade your pigment over time.


Day 14-28 (The "Ghosting" Phase)

  1. What you'll see: Welcome to the ghosting phase! This is when many clients panic because their brows look very light, almost invisible in some spots. You might see mostly your natural brow hairs with barely any pigment showing. Some clients swear their microblading has completely disappeared.
  2. What you'll feel: Physically, your brows should feel completely normal. No itching, no tenderness, nothing unusual. But emotionally? You might be stressed wondering if something went wrong.
  3. What to do: Trust the process! The pigment is still there, sitting beneath a fresh layer of skin that regenerated during healing. As this new skin matures, the color will gradually come back. Take progress photos so you can see the subtle changes happening day by day.
  4. This is also a good time to start thinking about your touch-up appointment. At Symetrie Studio Spa, we schedule touch-ups for 6-8 weeks after your initial procedure. Use this time to note any areas that need adjustment or additional coverage.
  5. What to avoid: Don't give up on your brows! Many clients consider this phase a "failure," but it's actually a normal part of the healing process. Avoid trying to fix your brows with makeup that might interfere with pigment retention.


Day 28-42 (True Color Emerges)

  1. What you'll see: Your brows start coming back! The pigment gradually becomes more visible as your skin fully heals. By day 42 (6 weeks), you should see about 60-80% of your final color. Your brows will still be lighter than they'll ultimately be after your touch-up.
  2. What you'll feel: Your brows should feel completely healed and normal. There should be no lingering tenderness, dryness, or sensitivity.
  3. What to do: Document any areas where pigment didn't retain well. Take clear photos in natural lighting to show your technician at your touch-up appointment. Notice which areas are too light, uneven, or need additional strokes.
  4. By week 6-8, you'll be ready for your touch-up appointment. This is a normal and essential part of the microblading process, not a sign that something went wrong. The touch-up allows your technician to perfect your shape, add density where needed, and ensure even color distribution.
  5. What to avoid: Continue avoiding harsh skincare products and chemical exfoliants on your brows. Be mindful of sun exposure – UV rays can fade your pigment over time.


Microblading Aftercare: Dry Healing vs. Wet Healing Methods

You might hear about different aftercare methods, and it can be confusing. Let's break down the two main approaches.


What is Dry Healing?

Dry healing means keeping your brows as dry as possible and avoiding the use of ointments or creams. With this method, you clean your brows gently but don't apply any products afterward.

  1. Pros: Some technicians believe dry healing leads to better pigment retention because you're not suffocating the skin with ointments. It's also simpler – fewer products to worry about!
  2. Cons: Your brows might feel drier and tighter during healing. The scabs might be thicker and more noticeable. Some people find this method uncomfortable during the itchy phase.
  3. When it's recommended: Dry healing is often recommended for oily skin types who naturally produce more sebum. It's also preferred by some technicians who find their clients get better results this way.


What is Wet Healing?

Wet healing involves keeping your brows moisturized with approved ointments or healing gels throughout the healing process. You clean your brows and then apply a very thin layer of product.


  1. Pros: Your brows feel more comfortable during healing. The scabs tend to be thinner and less noticeable. Many people find this method more comfortable, especially during the itchy phase.
  2. Cons: If you apply too much product, you can suffocate the skin and actually prevent proper healing. There's also a risk of removing pigment if you over-moisturize and the scabs become too soft.


When it's recommended: Wet healing is often recommended for dry or mature skin types. It's also good for people who are very active or live in dry climates.


Which Healing Method is Right for You?

At Symetrie Studio Spa, we'll recommend the best healing method based on your specific skin type, lifestyle, and the type of permanent makeup service you received. Always follow your technician's specific instructions rather than generic advice you find online.


The most important thing is consistency. Whatever method your technician recommends, stick with it throughout the entire healing process. Switching methods midway through can affect your results.


Essential Microblading Aftercare Instructions (Do's and Don'ts)

Let's make this super clear with specific do's and don'ts for each phase of healing.


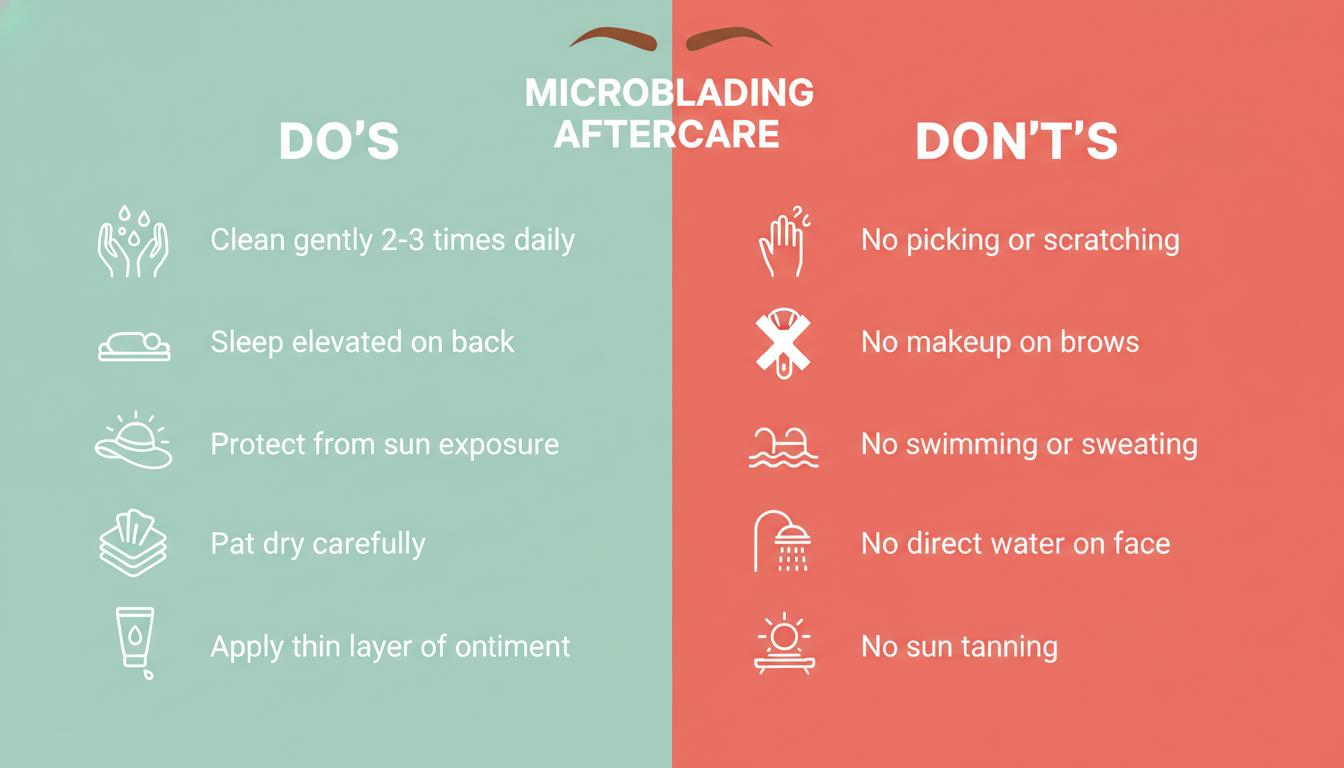
First Week Aftercare Do's

  1. Clean properly: Wash your brows 2-3 times daily with the approved cleanser. Use your fingertips (make sure they're clean!) and gently work the cleanser over your brows in a soft, circular motion. Rinse with cool water and pat dry with a clean tissue.
  2. Stay cool: Keep your face cool and avoid situations that make you sweat. Take lukewarm showers instead of hot ones, and keep your face out of the direct stream.
  3. Sleep smart: Sleep on your back with your head elevated on extra pillows. This helps reduce swelling and prevents you from rubbing your face into your pillow.
  4. Protect from sun: Wear a hat if you need to be outdoors. Sun exposure can fade your pigment and increase inflammation during healing.
  5. Follow instructions: Your technician at Symetrie Studio Spa will give you specific aftercare instructions. Follow them exactly! Don't mix and match advice from different sources.


First Week Aftercare Don'ts

  1. No water sports: Avoid swimming, hot tubs, saunas, and steam rooms completely. Chlorine and excessive moisture can pull pigment out of your skin.
  2. No sweating: Skip the gym, hot yoga, running, and any intense physical activity. Sweat contains salt, which can pull pigment from your brows.
  3. No makeup: Don't apply any makeup to your eyebrow area. Even if you think it's safe, just wait. Makeup can introduce bacteria and prevent proper healing.
  4. No touching: Don't touch your brows except when cleaning them. Your hands carry bacteria that can cause infection.
  5. No picking: This one is so important it deserves to be repeated. Do not pick, scratch, or rub your brows, no matter how itchy they get!
  6. No facials or treatments: Avoid any facial treatments, chemical peels, or laser procedures near your brows for at least 4 weeks.
  7. No sun tanning: Stay away from tanning beds and avoid prolonged sun exposure on your face.


Weeks 2-6 Aftercare Guidelines

Once the initial healing is complete (after about 2 weeks), you can gradually return to normal activities. However, you still need to be careful with your brows:


  1. Continue gentle cleansing: Use a mild, fragrance-free cleanser on your face, including your brow area.
  2. Return to exercise: You can resume working out, but try to keep sweat away from your brows when possible. Wipe your forehead frequently during workouts.
  3. Resume makeup carefully: You can start wearing makeup again, but be gentle when removing it from your brow area. Avoid rubbing harshly.
  4. Protect from sun: Start using SPF on your brows once they're fully healed (after 2 weeks). Sun exposure is the number one cause of premature fading.
  5. Avoid certain skincare: Keep retinols, glycolic acid, salicylic acid, and other strong active ingredients away from your brows. These can fade your pigment over time.


Products You Need for Optimal Microblading Healing

Having the right products makes a huge difference in your healing experience. Here's what you need:


Approved Cleansers

Your technician will typically provide or recommend a specific cleanser. At Symetrie Studio Spa, we give our clients detailed product recommendations during their appointment.


Look for gentle, fragrance-free cleansers with a neutral pH. Good options include:

  1. Cetaphil Gentle Skin Cleanser
  2. Neutrogena Ultra Gentle Daily Cleanser
  3. Baby shampoo (diluted)


Avoid cleansers with harsh chemicals, fragrances, or exfoliating ingredients. You want something that will clean your brows without stripping away natural oils or irritating healing skin.


Healing Ointments and Gels

If your technician recommends wet healing, you'll need an approved healing ointment. Common recommendations include:

  1. Aquaphor Healing Ointment (most popular)
  2. Aftercare+ Microblading Aftercare Balm
  3. Hustle Butter Deluxe
  4. A&D Ointment


Important: Only use ointments recommended by your technician. Some products can actually pull pigment out or cause infections. Apply only a very thin layer – less is more! You want your brows to look moist but not shiny or greasy.


What to Avoid (Products That Can Affect Pigment Retention)

These products can interfere with healing or fade your pigment:


During healing (first 2 weeks):

  1. Makeup of any kind on the brow area
  2. Makeup remover or cleansing oils
  3. Exfoliating scrubs or brushes
  4. Retinol or retinoid products
  5. Vitamin C serums
  6. Glycolic acid or AHA/BHA products
  7. Neosporin or triple antibiotic ointment


Long-term (after healing):

  1. Chemical exfoliants directly on brows
  2. Retinol treatments near brow area
  3. Chemical peels on the forehead
  4. Laser treatments near brows
  5. Self-tanners on the face (can oxidize pigment)

Book Into our Symetrie Studio Spa

Ready to take the next step? Book a consultation with a qualified permanent makeup artist.

Book Now

Factors That Affect Your Microblading Healing Process

Not everyone heals the same way. Several factors influence how quickly you heal and how well your pigment retains.


Skin Type Considerations


Oily skin: If you have oily skin, you might experience less pigment retention because the excess sebum can push pigment out as it travels through pores. Your microbladed strokes might also appear softer or more blended rather than crisp. You typically heal faster but may need more frequent touch-ups.


At your consultation with Symetrie Studio Spa, we'll assess your skin type and adjust the technique accordingly. For oily skin, we might use a slightly different pigment or make adjustments to stroke depth.


Dry skin: Dry skin typically holds pigment very well and heals with crisp, defined strokes. However, you might experience more discomfort during healing due to tightness and itching. Dry skin can also flake more dramatically, which can be alarming but is totally normal.


Combination skin: Most people have combination skin – oily in some areas and dry in others. Your healing might be different on each brow or even within different parts of the same brow.


Sensitive skin: If you have sensitive skin, you might experience more redness and swelling initially. Your healing time might be slightly longer, and you need to be extra careful about the products you use.


Age and Skin Health

Younger skin (teens to 20s) typically heals faster and retains pigment well. However, younger clients might need more frequent touch-ups because their skin cells turn over more quickly.


Mature skin (40s and up) might take slightly longer to heal but often retains pigment beautifully. The results can last longer too because cell turnover slows with age.


Your overall skin health also matters. Factors like hydration, nutrition, smoking, and sun damage all affect healing. Clients who take care of their skin generally see better, longer-lasting results.


Lifestyle Factors

Sun exposure: If you spend a lot of time outdoors or work outside, your pigment will fade faster. UV rays break down pigment molecules over time. Always wear SPF on your brows after healing!


Swimming: Regular swimmers (especially in chlorinated pools) often need more frequent touch-ups. Chlorine can fade pigment over time.

Exercise: Very active people who sweat frequently might experience slightly faster fading. This doesn't mean you can't exercise – just be mindful and use SPF.

Medications and supplements: Blood thinners, retinol treatments, vitamin E supplements, and certain medications can affect healing and pigment retention. Always disclose all medications and supplements during your consultation.

Alcohol and smoking: Both can slow healing and affect results. Avoid alcohol for at least 48 hours before and after your procedure. Smoking restricts blood flow, which can impact healing.


Individual Healing Response

Even with all these factors considered, some people just heal differently. Your body's unique immune response and healing mechanisms play a role. This is why following aftercare instructions precisely is so important – it gives your body the best environment for optimal healing.


Common Microblading Healing Problems and How to Fix Them

Let's talk about what can go wrong and how to handle it. Remember, true complications are rare when you choose an experienced technician and follow aftercare properly.


Uneven Pigment Retention

What it looks like: Some areas of your brows hold pigment well while other spots appear light or patchy. One brow might be darker than the other.

Why it happens: This is actually very common and usually not a problem! Pigment retention varies across different areas of the brow due to differences in skin thickness, oil production, and stroke direction. Areas with more natural hair might retain less pigment because there's more tissue disturbance.

What to do: Wait until your touch-up appointment (6-8 weeks). Your technician will fill in any light spots and even out the color. This is exactly what the touch-up is for! Don't stress about uneven healing – it's expected and easily corrected.


Excessive Scabbing or Flaking

  1. What it looks like: Your scabs are very thick, dark, and crusty. The flaking seems extreme or lasts longer than expected.
  2. Why it happens: This can occur if you're applying too much ointment, not cleaning your brows properly, or if your body produces heavy scabs naturally. It can also happen if you got your brows wet during the first few days.
  3. What to do: Continue following your aftercare routine but don't apply extra ointment thinking it will help. If you're doing wet healing, try applying less product or switching to dry healing (after checking with your technician). Keep your brows clean and let the scabs fall off naturally.


When thick scabs fall off, they often take more pigment with them, so you might have more fading than expected. Your touch-up will fix this.


Premature Fading

  1. What it looks like: Your brows seem to be fading much faster than expected, even before your touch-up appointment.
  2. Why it happens: Premature fading can result from not following aftercare, using wrong products, excessive sweating, swimming, or exposure to UV rays during healing. It can also happen with certain skin types or if the pigment wasn't placed at the correct depth.
  3. What to do: Review your aftercare routine to identify any mistakes. Make sure you're not using any products that might be fading your pigment (retinols, exfoliants, etc.). Protect your brows from sun exposure. Document the fading with photos to show your technician.


At your touch-up appointment, let your technician know about the excessive fading. They may need to adjust their technique or pigment choice.


Signs of Infection and When to Seek Help

True infections are rare with proper aftercare, but you should know the warning signs:


Normal healing symptoms:

  1. Slight redness (first 2-3 days)
  2. Minor swelling (first 1-2 days)
  3. Itching (days 5-10)
  4. Tenderness when touched (first week)


Warning signs of infection:

  1. Increasing redness that spreads beyond the brow area
  2. Significant swelling that gets worse after day 3
  3. Heat radiating from the area
  4. Yellow or green pus
  5. Severe pain that doesn't improve
  6. Fever or feeling unwell
  7. Red streaks extending from the brow area


What to do: If you notice any warning signs, contact your microblading technician immediately. They can assess whether you need medical attention. Don't hesitate to see a doctor if you're concerned – it's better to be safe!


For minor irritation, make sure you're cleaning properly and not using any irritating products. Sometimes what looks like infection is just a reaction to a product you're using.


Microblading Touch-Up Appointment: Why It's Essential

Your initial microblading procedure is only the first step. The touch-up appointment is not optional – it's an essential part of the process that completes your results.


Why you need a touch-up:

  1. Allows your technician to perfect your shape and symmetry
  2. Fills in any areas where pigment didn't retain well
  3. Adds additional density if needed
  4. Adjusts color if necessary
  5. Ensures even pigment distribution


During healing, everyone experiences some pigment loss – it's completely normal. Some areas naturally retain better than others. Your touch-up appointment at Symetrie Studio Spa gives us the opportunity to perfect your brows and ensure you're thrilled with your results.


When to schedule: Touch-ups are typically scheduled 6-8 weeks after your initial appointment. This gives your skin enough time to fully heal and for the true color to emerge. Some skin types might need the full 8 weeks, while others are ready at 6 weeks.


What happens during your touch-up: Your technician will assess your healed results, discuss any concerns you have, and make adjustments. They'll fill in light spots, add more strokes if needed, or adjust the shape slightly. The process is much quicker than your initial appointment – usually 1-2 hours total.


The touch-up also requires healing time, though it's typically shorter (2-3 weeks) since less work is being done.


Cost: At many studios, the first touch-up is included in your initial microblading price. At Symetrie Studio Spa, we'll explain our touch-up policy during your consultation so there are no surprises.


Long-Term Microblading Care and Maintenance

Once you're fully healed and have completed your touch-up, you'll want to maintain your beautiful brows for as long as possible.


How Long Does Microblading Last?

Microblading typically lasts 12-18 months before needing a refresh. However, this varies significantly based on:

  1. Your skin type (oily skin fades faster)
  2. Sun exposure (UV breaks down pigment)
  3. Skincare routine (certain products fade pigment)
  4. Lifestyle factors (swimming, sweating)
  5. Pigment color (lighter colors fade faster)
  6. Your body's metabolic rate


Some clients find their microblading lasts two years or more, while others need annual touch-ups. There's no "right" answer – it's simply how your unique body processes the pigment.


Annual Touch-Up Schedule

Even with perfect care, your microblading will gradually fade. This is actually a good thing! It means the pigment is breaking down naturally rather than staying in your skin permanently (which could look outdated as your face ages and trends change).


Most clients return for annual touch-ups. These maintenance appointments keep your brows looking fresh and allow you to make adjustments as needed. Maybe you want them slightly fuller, or perhaps you'd like to adjust the arch. Annual touch-ups give you that flexibility.


Daily Care Tips for Longevity

Use SPF religiously: This is the number one thing you can do to preserve your microblading. Apply SPF 30 or higher to your brows every single day, even in winter. UV exposure is the biggest cause of premature fading.


Modify your skincare routine: Keep these products away from your brows:

  1. Retinols and retinoids
  2. Glycolic acid and AHAs
  3. Salicylic acid and BHAs
  4. Vitamin C serums (high concentration)
  5. Chemical exfoliants
  6. Lightening agents

You can still use these products on the rest of your face – just be careful around your brow area.


Moisturize gently: Keep your brows and the surrounding skin moisturized with a gentle, non-exfoliating moisturizer. Healthy skin holds pigment better.


Be gentle with makeup removal: When removing eye makeup, be careful not to rub harshly over your brows. Use gentle, downward motions rather than back-and-forth scrubbing.


Protect during activities: Wear a hat or sunglasses when you're outdoors for extended periods. If you swim regularly, try to keep your face out of the water when possible, or wear a swim cap.


When to Consider Color Boost or Refresh

Between your annual touch-ups, you might notice your brows starting to fade. If they're getting light but you're not quite due for a full touch-up, some studios offer color boost appointments. These quick sessions refresh your color without adding new strokes.


You might want a color boost if:

  1. Your brows are noticeably lighter but the shape is still great
  2. You have a special event coming up and want your brows to look their best
  3. You've had more sun exposure than usual and your brows faded faster
  4. It's been 6-8 months since your last touch-up and you're noticing fading

Talk to your technician at Symetrie Studio Spa about whether a color boost or full touch-up is right for your situation.


Microblading Healing Timeline: Quick Reference Chart

Here's a quick visual summary of what to expect:

  1. Days 1-2: Bold, dark brows. Slight tenderness. Keep clean and dry.
  2. Days 3-5: Darkest point. Scabs forming. Itching begins. No picking!
  3. Days 5-7: Flaking starts. Brows look crusty. Maximum itching. Stay strong!
  4. Days 8-10: Heavy flaking. Patchy appearance. Keep hands off!
  5. Days 11-14: Flaking complete. Much lighter. Surface healed.
  6. Days 14-28: Ghosting phase. Very light appearance. Pigment settling deep.
  7. Days 28-42: True color emerging. 60-80% of final result visible.
  8. Week 6-8: Ready for touch-up appointment. Complete the process.


Frequently Asked Questions About Microblading Healing

Let's answer the questions we hear most often at our Lafayette studio.


Why do my microbladed brows look so dark immediately after?

Your brows look dark right after microblading for two reasons. First, there's some blood and lymph fluid mixed with the pigment on the surface of your skin. Second, the pigment is sitting on top of your skin in addition to being in your skin. Once the scabs form and fall off, taking that surface pigment with them, your brows will lighten significantly. The color you see immediately after is not your final result – your true color will be about 30-40% lighter.


Can I wear makeup during the healing process?

Absolutely not during the first two weeks! Makeup can introduce bacteria into the healing skin and cause infection. It can also interfere with proper healing and pigment retention. After two weeks, once your brows are surface-healed, you can start wearing makeup again. Just be gentle when removing it, and avoid applying makeup directly on your microbladed strokes if possible. Wait until after your touch-up appointment for best results.


When can I return to the gym or swim?

You can return to light exercise after about 10-14 days, once the flaking is complete and your brows are surface-healed. However, avoid activities that make you sweat heavily for the full two weeks. As for swimming, wait at least two weeks for pools and four weeks for ocean or lake swimming. Chlorine and salt water can pull pigment from your skin and affect your results. If you're a serious athlete or swimmer, discuss your specific situation during your consultation at Symetrie Studio Spa.


Is it normal for my brows to disappear during healing?

Yes! The ghosting phase (weeks 2-4) scares a lot of people, but it's completely normal. Your brows aren't actually disappearing – the pigment is just sitting beneath a fresh layer of skin that regenerated during healing. As this new skin matures and thins slightly, the color will gradually come back. By week 6, you should see your brows emerging again. This is exactly why the touch-up appointment happens at 6-8 weeks – it's when we can accurately assess your healed results.


How do I know if my microblading is healing properly?

Proper healing follows a predictable pattern: bold and dark initially, darkening a bit around day 3-4, flaking between days 5-10, much lighter after flaking, and gradual color return by week 4-6. Your brows should never be hot to the touch, extremely swollen, oozing yellow or green pus, or causing severe pain. Mild redness, itching, and flaking are normal. If you're concerned about your healing at any point, take photos and contact your technician. We're always happy to look at your healing progress and provide reassurance or guidance.


Can I speed up the microblading healing process?

Not really, and you shouldn't try! Your body heals at its own pace, which is determined by your age, skin type, overall health, and genetics. The best thing you can do is follow your aftercare instructions perfectly and give your body the support it needs: stay hydrated, eat nutritious foods, get enough sleep, and avoid things that slow healing (like alcohol and smoking). Trying to speed up healing by picking at scabs or using products not approved by your technician will only make things worse.


What if I'm unhappy with my microblading results?

First, wait until after your touch-up appointment to make final judgments. Your brows will look very different at different stages of healing, and your true results won't be visible until week 6-8. If after your touch-up you're still unhappy, communicate with your technician. Professional microblading artists want you to be satisfied and will work with you to achieve results you love.


At Symetrie Studio Spa, we take pride in our work and want every client to feel beautiful and confident. We'll discuss your concerns during your touch-up and make adjustments as needed. In rare cases where someone is truly unhappy with their permanent makeup, there are removal options available, though we hope it never comes to that!


Remember that microblading is an art as much as it is a technique. Minor asymmetries are normal – your face is naturally asymmetric, and your brows should match your face, not be identical to each other.


Final Thoughts: Patience is Key to Perfect Microblading Results

The microblading healing process can feel like an emotional rollercoaster. Your brows will look amazing, then too dark, then patchy, then almost invisible, and finally – beautifully natural. Understanding this process before you start helps you stay calm through all the changes.


Remember these key points:

  1. Healing takes 4-6 weeks, not a few days
  2. Your brows will go through several dramatic changes
  3. The ghosting phase is normal and temporary
  4. Following aftercare instructions is crucial for good results
  5. Your touch-up appointment is essential, not optional
  6. What you see immediately after is not your final result


At Symetrie Studio Spa in Lafayette, we guide you through every step of your microblading journey. We provide detailed aftercare instructions, quality aftercare products, and ongoing support throughout your healing process. We're always available to answer questions or look at progress photos if you're worried about how your brows are healing.


Choosing an experienced, licensed professional for your permanent makeup services makes all the difference. We use proper techniques, premium pigments, and sterile procedures to ensure optimal results and safe healing.

Ready to transform your brows with microblading?

Schedule a consultation with Symetrie Studio Spa to discuss your goals and learn more about what to expect. We'll assess your skin type, discuss your desired look, and create a personalized plan for beautiful, natural-looking brows that enhance your features.

Book Now